

Headshot Grid
A better, more polished contact sheet grid to share.
Headshot Grid using Adobe Bridge helps photographers build polished branded contact sheet grids from volume headshot sessions, with flexible event and sponsor branding in the header, footer, center cell, or large center-logo layout. Reduce the friction showing off the results of a great project and help with event promoter and sponsor visibility.
What It Does:
Organizes selected images into an attractive grid or contact sheet to highlight a headshot project’s results.
Customize the final composite look - square, generally horizontal, or generally vertical in design.
Customize the center of the grid for a small or larger logo - great for the company’s or event’s logo.
Customer the header and footer with text, font, size, and additional logos.
Optionally place an additional logo in the last open grid slot - great for your own logo.
Optionally place a border around the grid images.
Why Headshot Grid is valuable:
Highlight the consistency and capacity of your headshot skills as well as emphasize event promoter and sponsor information on the finished headshot contact sheet. Great for social media and including in proposals for big projects. A completed Headshot Grid contact sheet lets you confidently answer the client's question of, “Can you handle a big headshots project?” with a “Let me know you samples of what I have done!”

Vertical Design Bias
Running Headshot Grid under Adobe Bridge.
Using Adobe Bridge, open the folder that contains all of the images to be used for the grid and select a handful or all of the images in the folder. All photos must be the same orientation (horizontal, vertical, or square).
Click on Tools → Photographer’s Toolbox → Headshot Grid.
Pick your desired options from the tabs. Headshot Grid remembers you settings from run to run.
Basics tab: Set image border size, stroke color, and whether the resulting grid should be square, biased to a horizontal, or biased to be vertical.
Center Logo tab: Enable / disable a logo image in the center of the grid. Specify logo location and logo size.
Final Cell Logo tab: Enable / disable a logo to be placed in the last open grid position. A great place to put your company logo.
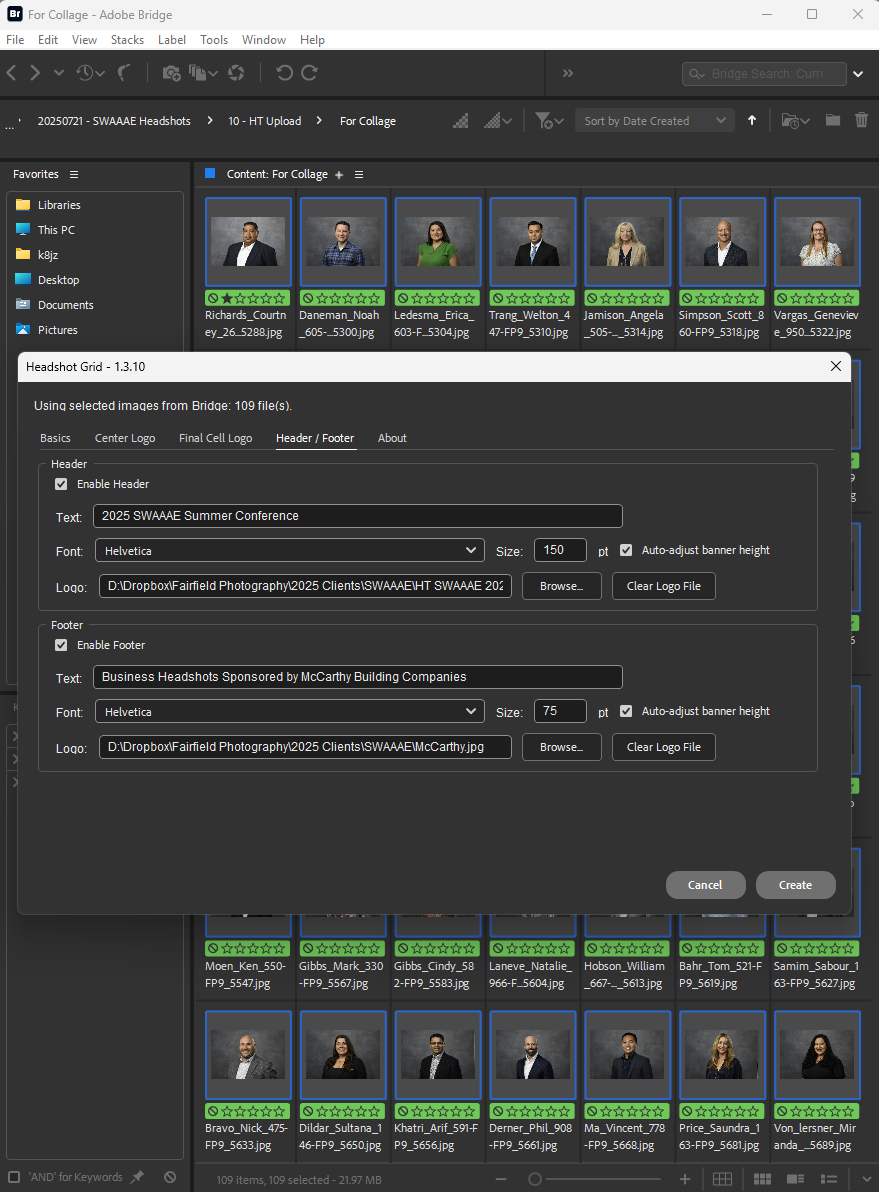
Header / Footer tab: Enable / disable the header and footer. Each area can have custom text, text size, and font (limited to standard fonts) plus a right-justified logo.
Click the “Create” button. Depending on the number of images being processed, Headshot Grid will take anywhere from 30 seconds to several minutes to create. A progress windows displays the number of images completed.

Horizontal Design Bias
FAQ
Q: How much does this handy tool cost?
A: There is no charge for this tool. You may not disassemble it or modify it. You may not re-sell it. Use it to make yourself a more efficient volume photographer.
Q: Can I use this with images other than headshots?
A: Sure! Just be sure to make all the images in the folder the same orientation/proportion.
Q: The plug-in tool does not run.
A: Contact support at hello@PhotographgersToolbox.com for assistance with resolving the issue.
Q: The tool isn’t including all of the photos in the folder or the number of photos being included is increasing each time I run the tool.
A: Adobe Bridge needs to generate thumbnails and capture basic EXIF information when it first opens a new folder. For larger folders, this could take several minutes. This is only necessary the first time a folder is opened in Bridge and the time the images are cached is controlled by the “Cache” preferences in Adobe Bridge.
Installation
Custom Adobe Bridge tool scripts like this go in the “Startup Scripts” folder for Adobe Bridge. The fastest way to access this folder is to access the Adobe Bridge “Preferences” under the main “Edit” menu (for Windows) or “Settings” under the main “File” menu (MacOS). Select “Startup Scripts” preference option and click the “Reveal Scripts in Explorer” (Windows) or “Reveal Scripts in Finder” (Mac). Copy the file “Headshot Grid.jsxbin” to the folder and restart Bridge. If the “Startup Scripts” folder doesn’t exist, create it, then copy the .jsxbin file into that folder.
The first time Bridge is run with the script installed, Bridge will display a message confirming the script has been install in Bridge and is now available.
You will find Headshot Grid under the Tools → Photographer’s Toolbox Adobe Bridge menu.
Version History
v1.3.10 - Public Release
Headshot Grid
A better, more polished contact sheet grid to share.
Headshot Grid using Adobe Bridge helps photographers build polished branded contact sheet grids from volume headshot sessions, with flexible event and sponsor branding in the header, footer, center cell, or large center-logo layout. Reduce the friction showing off the results of a great project and help with event promoter and sponsor visibility.
What It Does:
Organizes selected images into an attractive grid or contact sheet to highlight a headshot project’s results.
Customize the final composite look - square, generally horizontal, or generally vertical in design.
Customize the center of the grid for a small or larger logo - great for the company’s or event’s logo.
Customer the header and footer with text, font, size, and additional logos.
Optionally place an additional logo in the last open grid slot - great for your own logo.
Optionally place a border around the grid images.
Why Headshot Grid is valuable:
Highlight the consistency and capacity of your headshot skills as well as emphasize event promoter and sponsor information on the finished headshot contact sheet. Great for social media and including in proposals for big projects. A completed Headshot Grid contact sheet lets you confidently answer the client's question of, “Can you handle a big headshots project?” with a “Let me know you samples of what I have done!”
Vertical Design Bias
Running Headshot Grid under Adobe Bridge.
Using Adobe Bridge, open the folder that contains all of the images to be used for the grid and select a handful or all of the images in the folder. All photos must be the same orientation (horizontal, vertical, or square).
Click on Tools → Photographer’s Toolbox → Headshot Grid.
Pick your desired options from the tabs. Headshot Grid remembers you settings from run to run.
Basics tab: Set image border size, stroke color, and whether the resulting grid should be square, biased to a horizontal, or biased to be vertical.
Center Logo tab: Enable / disable a logo image in the center of the grid. Specify logo location and logo size.
Final Cell Logo tab: Enable / disable a logo to be placed in the last open grid position. A great place to put your company logo.
Header / Footer tab: Enable / disable the header and footer. Each area can have custom text, text size, and font (limited to standard fonts) plus a right-justified logo.
Click the “Create” button. Depending on the number of images being processed, Headshot Grid will take anywhere from 30 seconds to several minutes to create. A progress windows displays the number of images completed.
Horizontal Design Bias
FAQ
Q: How much does this handy tool cost?
A: There is no charge for this tool. You may not disassemble it or modify it. You may not re-sell it. Use it to make yourself a more efficient volume photographer.
Q: Can I use this with images other than headshots?
A: Sure! Just be sure to make all the images in the folder the same orientation/proportion.
Q: The plug-in tool does not run.
A: Contact support at hello@PhotographgersToolbox.com for assistance with resolving the issue.
Q: The tool isn’t including all of the photos in the folder or the number of photos being included is increasing each time I run the tool.
A: Adobe Bridge needs to generate thumbnails and capture basic EXIF information when it first opens a new folder. For larger folders, this could take several minutes. This is only necessary the first time a folder is opened in Bridge and the time the images are cached is controlled by the “Cache” preferences in Adobe Bridge.
Installation
Custom Adobe Bridge tool scripts like this go in the “Startup Scripts” folder for Adobe Bridge. The fastest way to access this folder is to access the Adobe Bridge “Preferences” under the main “Edit” menu (for Windows) or “Settings” under the main “File” menu (MacOS). Select “Startup Scripts” preference option and click the “Reveal Scripts in Explorer” (Windows) or “Reveal Scripts in Finder” (Mac). Copy the file “Headshot Grid.zip” to the folder and then double-click on the .zip file to show the contents. Copy the .jsxbin, program plus the .html/.pdf User Guides to the Startup Scripts folder and restart Bridge. If the “Startup Scripts” folder doesn’t exist, create it, then copy the files into that folder.
The first time Bridge is run with the script installed, Bridge will display a message confirming the script has been install in Bridge and is now available.
You will find Headshot Grid under the Tools → Photographer’s Toolbox Adobe Bridge menu.
Version History
v1.3.10 - Public Release